Interfacing Ultrasonic Sensor with Arduino | Ultrasonic Sensor Arduino Code
Hello friends! Welcome back to ElectroDuino. This tutorial is base on the Interfacing Ultrasonic sensor with Arduino. After understanding the “Ultrasonic Sensor Module-HC-SR04 | How it’s Works” in the previous blog. Here we will discuss Introduction to Interfacing Ultrasonic Sensor with Arduino, how the ultrasonic sensor connects with the Arduino circuit diagram and the ultrasonic sensor Arduino code. Also, we will learn how to measure the distance using this Sensor.
Introduction
In this project, we are going to make a distance measuring device using the ultrasonic sensor and Arduino, which can measure distance in the range of 2 cm to 400 cm. Using this project we can easily understand how the ultrasonic sensor works. When any object or obstacle comes in front of the sensor then the sensor measure distance between the object or obstacle and it. Then print the measuring distance on the Serial Monitor window of the Arduino IDE.
Components Required
| Components Name | Quantity |
| Arduino UNO ((you can use other types of Arduino like Arduino NANO, MEGA, pro mini, etc) | 1 |
| HC-SR04 Ultrasonic Sensor Module | 1 |
| Connecting wires | As required in the circuit diagram |
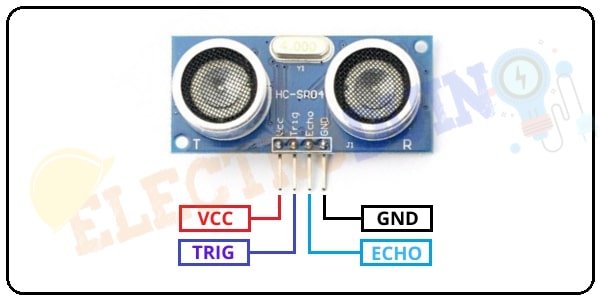
Ultrasonic Sensor Pin Diagram

| For More Details: Ultrasonic Sensor Module-HC-SR04 | How it’s Works |
How to Connect Ultrasonic Sensor with Arduino
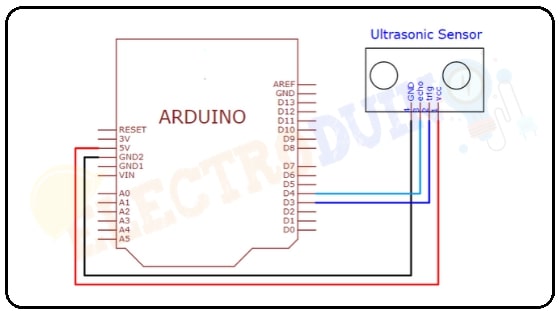
First of all, we need to connect the Vcc pin to the Arduino 5v pin and the GND pin is connected to the Arduino ground (GND) pin, to activate the sensor. Then connect the Trig pin to a digital pin of Arduino and set this pin as an output to generate ultrasonic waves from the transmitter. The Echo pin is connected to another digital pin of Arduino and sets this pin as an Input to read the output value from the Ultrasonic sensor.
Ultrasonic Sensor with Arduino Circuit Diagram

Ultrasonic Sensor with Arduino Schematic-Circuit Diagram
Circuit Wiring
The following table represents the pin connection between the Ultrasonic sensor and Arduino.
| HC-SR04 Ultrasonic Sensor pin | Arduino pin |
| Vcc pin | +5 v pin |
| Trig | Digital pin D3 |
| Echo | Digital pin D4 |
| Ground | Ground pin |
How Arduino Measure Distance using Ultrasonic Sensor
At first, We need to trigger the ultrasonic Sensor for 10 microseconds to generate ultrasonic wave from the transmitter part. If any object comes in front of the sensor detection range. Then the ultrasonic wave reflects back from the object surface to the receiver part. When the receiver receives the wave then the Eco pin provides high output. Now the Arduino read the time duration between triggering and Receiving the wave by the sensor.
Then Arduino calculate the distance between the sensor and object by a simple formula
Distance= (Ultrasonic wave travel time x Speed of sound)/2
Where the speed of sound in Air is around 340 meters/second or 0.034cm/µs.
In this way, Arduino measures distance using the Ultrasonic sensor.
Ultrasonic Sensor Arduino Code
/* interfacing ultrasonic sensor with Arduino
by sourav
www.electroduino.com */

int trigpin = 3;
int echopin = 4;

long duration;
int distance;

void setup()
{
pinMode(trigpin,OUTPUT);
pinMode(echopin,INPUT);
Serial.begin (9600);
}

void loop()
{

digitalWrite(trigpin,LOW);
delayMicroseconds(2);

digitalWrite(trigpin,HIGH);
delayMicroseconds(10);
digitalWrite(trigpin,LOW);

duration = pulseIn(echopin,HIGH);

distance = duration*0.034/2;

Serial.print("distance:");
Serial.print(distance);
Serial.println(" cm");
delay(500);

}
Code Analysis
Here we will describe the code line by line for your better understanding.
Code Line | Description |
| it is declared your Ultrasonic sensor trig pin connected to Arduino pin “D11” and named as |
| define two variables, these are duration and distance |
| initialize Arduino digital pin 11, as an OUTPUT. That will provide input voltage to the trig pin for generating ultrasonic sound waves from Transmitter. |
| initialize Arduino digital pin 10, as an INPUT. That will read the output from your Sensor, |
| this function starts serial communication, at 9600 bits of data per second, between your board and your computer with the line. |
| At the starting of the loop, set the trig pin low for Clears the trig Pin for 2 microseconds. |
| Then, set the trig pin High for 10 microseconds and again set the trig pin Low. This is used to generate ultrasonic wave for 10 microseconds from the sensor transmitter. |
| The function pulseIn is read the ultrasonic wave receive by the sensor receiver and store this value in the variable duration. |
| this is the formula for Distance Calculation. |
| using this command you can print the distance value on your serial monitor window. |
| the delay is used to get clear output on the serial monitor. |
Output:
using this project u can calculate the distance between the sensor and an object and print the distance value on the serial monitor.


Pingback: Ultrasonic Sensor Module-HC-SR04 | How it's Works » ElectroDuino